I share a post on Facebook to get exposures, shares, likes, and ultimately traffic to my website.
You might have a different reason to share a post on Facebook. Whatever that might be, I’ll show you the right way to share a post on Facebook.
Facebook is the best place to promote and build an audience for my blog.
Some people consider Facebook a better place to generate blog traffic than Google. I, however, use both platforms to drive traffic to my blog site.
Search Engine Optimization (SEO) is the standard method to generate organic traffic from Google. I suggest you follow the link to learn more about this topic.
The process of driving traffic from Facebook to a website starts with sharing a post on Facebook.
Today, I’ll talk about how to share a post on Facebook to generate traffic to a blog or website.
This article provides a quick guide to the process of sharing a post on Facebook. If you want to learn this process in more detail, I suggest you download the eBook above.
Tired Of Scams And Pyramid Schemes?
Your Work From Home Opportunity!
Before you can share a post on Facebook, you or someone must Create a Post.
There are two ways to create a post on Facebook.
The first option is creating and sharing the post on to Facebook directly from a webpage. People refer to this as Facebook website shares.
The second method is creating and sharing a post inside the Facebook account. This is known as posting or create a post.
This option is only available if the site owner/blogger allows visitors to create and share the blog post on Facebook.
If you look to the right side of this blog post, you see a blue circle button with a letter f which allow you to click and create a post to share on Facebook.
I allow and even encourage all my readers to share my post on Facebook if it seems interesting to them.
You can use this as a practice for this lesson.
You start creating a post by click on the blue button on the right side of this blog post.
A window open allowing you to create, add comments, and edit the post.
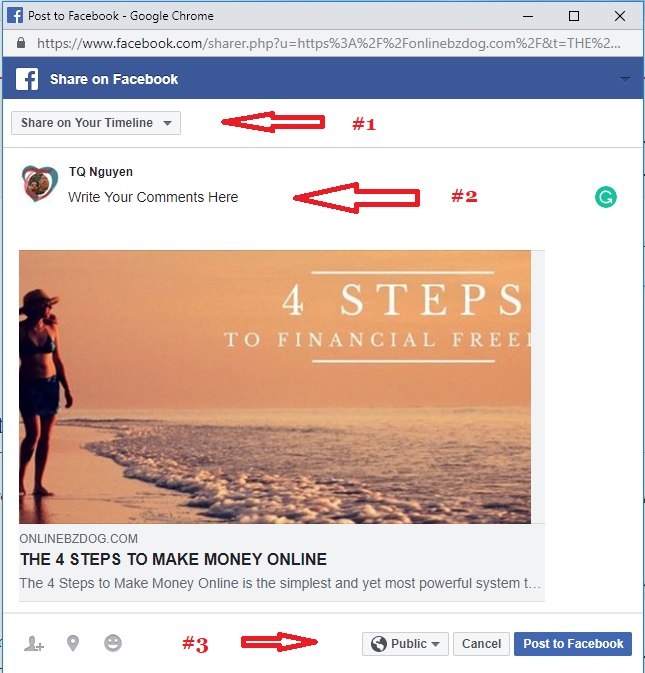
1. On the top left side, #1, is a drop-down window allowing you to select where to share the post on Facebook. You have the following selection with the default is:
-
- Share on your own timeline
- Share on a friend’s timeline
- Share in a group
- Share in an event
- Share on your Page you manage
- Share in a private message
For this exercise, I’ll select sharing on your own timeline.
2. Below is #2, a text area for you to write a short message about the post. This is optional.
3. When sharing a post on your own timeline, you have the option to choose who can see the post by clicking on the drop-down window #3 at the bottom right side. You can set the post visibility with one of the following options:
-
- Public
- Friends
- Friends exception
- Specific friends
- Only me
4. Click on the ‘Post to Facebook’ button to share the post on Facebook.
You’ll need to log in to your Facebook account to view the post that you have just created.
You can use this option to create a post or share a webpage on Facebook. To start, you have to log in to your Facebook account.
Once inside your Facebook timeline, on the top, you see a block with the heading ‘Create Post.’
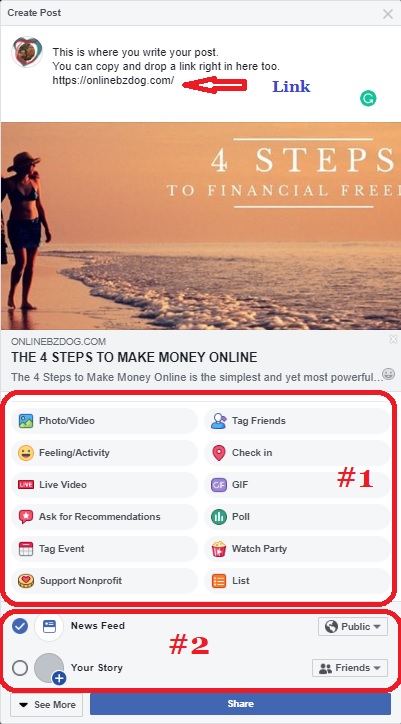
1. Click inside the box to open the editing window above to start writing your post. You can also drop a link to a webpage or a blog post directly into this area.
2. Using different options in box #1, you can add different expressions on the post.
3. At the bottom, box #2, you have two options to share the post on Facebook.
You can share as ‘News Feed’ and choose who can see the post.
You can share as ‘Your Story’ and choose who can see this story.
4. Click on the ‘Share’ button to share the post that you have just created on Facebook.
This is when you see a post created by someone, and you want to share it with your friends or with a group. This is called a reshare.
This is how to reshare a post on your Facebook News Feed.
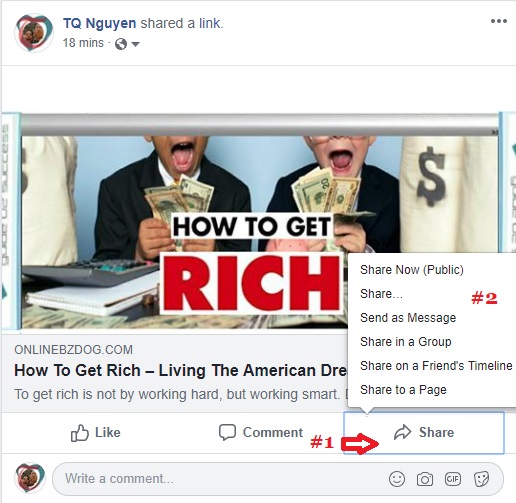
1. Click ‘Share’ on the bottom right of the post that you wanted to reshare, #1.
A small window opens with 6 different options to share, #2.
2. You can choose one of the six options to reshare the post on Facebook.
-
- Click on ‘Share Now (Public)’ to immediately share on your timeline.
- Click on the other 5 share options, a small window opens which you can:
-
-
-
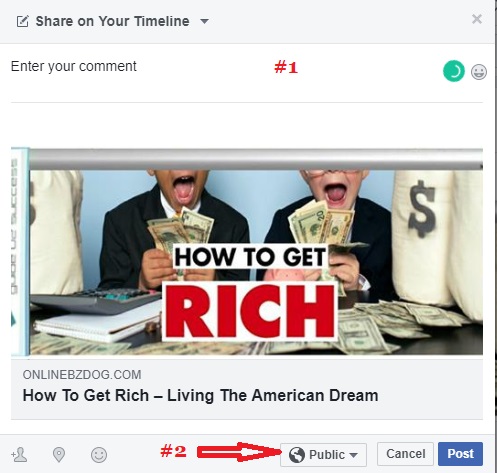
- You can write a comment into area #1
- You can choose who can see the post clicking on the drop-down #2
-
-
3. Click on ‘Post’ to share the post on Facebook.
You can promote your post and expand its reach by sharing it with different groups on Facebook.
Promoting your post on the Facebook group is a powerful way to expand your reach and social media influence.
Every successful blogger and website owner should learn how to share your post on the Facebook group to promote your online business.
Here’s how you promote your post on Facebook Group:
After created and posted your blog post on Facebook, you need to visit the post and:
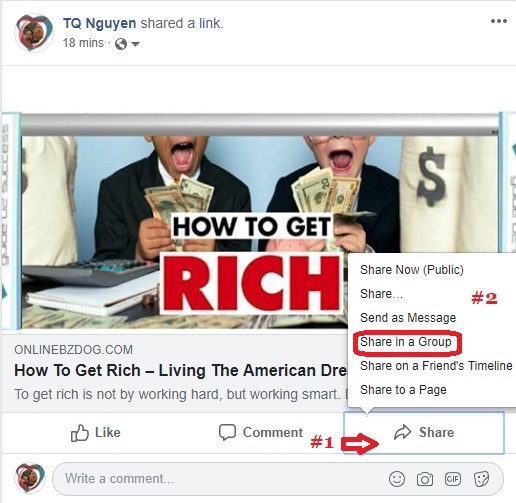
1. Click on ‘Share’ at the bottom of the post, #1.
2. Select ‘Share in a Group’ option in box #2.
The ‘Share in Group’ window opens allowing you to:
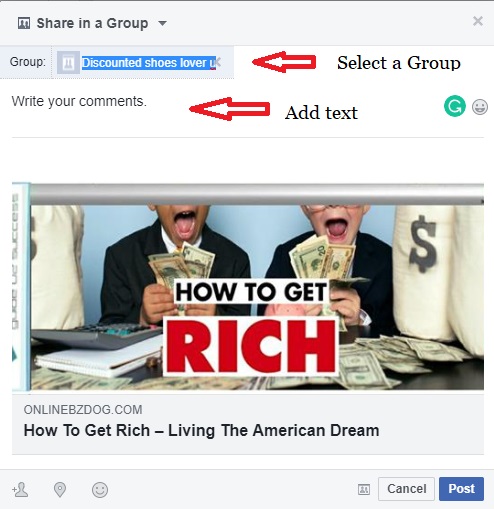
3. Select a group that you want to share the post on Facebook.
4. Add comments or promotional marketing info in the text area. (This is optional).
5. Click on the ‘Post’ button at the bottom to share the post.
The process of sharing a post on Facebook Group is no different from resharing a post. The only extra step you have to do is select a Facebook group that you want the post to appear.
Above are the options for you to share a post on Facebook.
We share posts on Facebook to expand our social media reach, increase followers, likes, and shares.
The ultimate goal for bloggers and website owners is to drive traffic from Facebook to their websites.
If you want to learn more about promoting your website on Facebook, I suggest you download a free copy of my eBook, ‘How To Promote Your Website On Facebook,’ to discover how you can use social media to promote your online business.
I hope this short tutorial on how to share a post on Facebook inspires you to explore the full power of this social media site.
Be sure to connect with me on Facebook.


